Tank Mod Mega Thread

Building Tips, Suspension Set Ups, Conversion Parts .... Build to your Heart's Content!
Post Reply
AngryShawn
Posts: 173
Joined: September 3rd, 2007, 9:33 pm
Contact:

Tank Mod Mega Thread

Post by AngryShawn »

There are a bunch of individual threads on this topic but after recently dong my first tank heat mod for my 04 250x conversion, I wanted to get a thread going that tries to cover everyone's experiences doing this mod.
Here are the existing threads on the subject:
http://bannedcr500riders.com/board/viewtopic.php?t=341
http://bannedcr500riders.com/board/viewtopic.php?t=636
http://bannedcr500riders.com/board/viewtopic.php?t=2081
http://bannedcr500riders.com/board/viewtopic.php?t=2202
http://bannedcr500riders.com/board/viewtopic.php?t=4117
http://bannedcr500riders.com/board/viewtopic.php?t=4840
http://bannedcr500riders.com/board/viewtopic.php?t=6241
http://bannedcr500riders.com/board/viewtopic.php?t=6337
Many thanks to all the original posters.
Please post your thoughts, experiences, comments and suggestions!

General comments gleaned from the boards:
  • wash tank with simple green solution to clear out residual fuel
    use modeling clay and pack it all around areas that touch, be sure there is at least a half inch of clay that protrudes all around, carefully put the tank in position and press down so you create a negative impression into the clay. This will tell you where you need to push in the tank for a clean fit
    mark the tank with notes on how you need to modify (depth/area/etc...)
    pre-heat the tank with boiling water
    use a good head gun and set it to low
    keep heat gun 8-12 inches from tank surface
    if the tank starts turning brown that means it is burning :shock:
    heat an area at least 2x the size of the area you need to mod
    Once the area is hot and pliable (it might turn a little shiny), you need to work somewhat quickly to get the job done.
    use a non-heat conducting, smooth/rounded object to manipulate the tank
    The plastic will become slightly more brittle with heat cycles, and as you move the plastic, the wall thickness will become less uniform. This is why you use an object that is larger than the area you need to move and you heat a much larger area as well, to spread out the stretching to keep the tank as stress-free as possible. If you push in the tank with the round end of the barrel of the bat, you keep the stress point to a minimum. If you need to move an area that is smaller, try using the end of a hammer handle...that works too.
    go slow and take your time!
Notes from my experience
  • From beginning to end, the process took me 3+ hours (note to self: stock plenty of refreshments)
    set up a really stable jig to hold the tank. This is a must as it will make your life much easier. Mine worked, but was ghetto and a PITA at times when trying to really press on the tank
    the end of a ball bat was too unwieldy to use (due to length and trying to hold the heat gun with the other hand) one of those mini souvenir bats would probably work really well
    i had trouble at times with hot plastic sticking to the hammer handle or other wood objects i used. to resolve the issue i removed the heat source momentarily, allowing the plastic to cool slightly and then gently scraped it apart using a screwdriver, end of a hose clamp, whatever was handy
    i had my best luck using the rounded side of the head of a hammer to press on the tank, though it did get really hot as I kept it under the head gun while working. using a ball peen end also would probably work really well. I noticed the least amount of plastic sticking with this method
    having a second set of hands would have been VERY helpful (see refreshment note earlier)
    As I got closer to being done, I test fit the tank on the bike, the hot plastic actually got a small indentation from the plug wire so I know where I needed to keep working
    I pulled through the tank in several small areas due to plastic sticking, but was able to scrape/move plastic from other areas and re-melt it in place
    I noticed that the inside of the tank was showing cracks due to the inside surface not heating at the same rate or temp as the outside. more reason to try and pre-heat the inside
Questions/ideas for the next time around
  • definitely going to try pre-heating with boiling water
    has anyone tried pre-heating at a low temp in the oven in conjunction with the hot water prep?
    I'm thinking adding boiling water and heating in the oven for say 30 min at 200 (while the wife is out of course) :lol:
    what about using some sort of release agent on the object used to mod the tank to prevent sticking (silicon spray/vegetable oil/water)?
    what have you guys done to re-locate the fuel spigot? I chose to leave mine in place and it was a bit of a challenge as the tank needed the most modification right next to the spigot mounting point. However this still puts it at the lowest point on the tank, which I wanted.
I'll post some pics of my tank in a bit and encourage everyone to do the same.
Thanks
Shawn
User avatar
Roostius_Maximus
Site Admin
Posts: 4641
Joined: November 16th, 2007, 3:24 pm
Location: Mt Nebo, Manitoba, Canada
Contact:

Post by Roostius_Maximus »

Did you have to mod that tank like i posted?
AngryShawn
Posts: 173
Joined: September 3rd, 2007, 9:33 pm
Contact:

Post by AngryShawn »

My cyl head has the TTM water outlet mod so the hose to the radiator was right in the way of the petcock. I could have run it though with some slight plumbing modification, it was just too small for me (about 1.5 gal per my haphazard calculations) so I sent it back.
AngryShawn
Posts: 173
Joined: September 3rd, 2007, 9:33 pm
Contact:

Post by AngryShawn »

Did my second tank mod last night and learned some good stuff worth sharing, apologies if this is common knowledge, I didn't see it anywhere else.
The tank I modified is a 3gal clarke on an 04 250x conversion. It had significantly better clearance than the stock tank, but still required some adjusting.
The main thing I learned was that the tank is constructed of different material than the OEM tank. When hot, it wouldn't hold a modified shape like the stocker. I ended up getting the area nice and pliable and then fit it to the bike and secured it with the mounting bolt and strap. It cooled and everything clears nicely thought he plug boot is in contact with the tank, its nothing I'm going to worry about.
If I was to do it again I would temporarily add a section of hose to the plug boot to give extra clearance once the tank had cooled.
Trough Lolly
Posts: 3
Joined: January 19th, 2014, 5:16 pm
Location: Australia, VIC

Post by Trough Lolly »

In regards to the Gen 4 tanks,
Has anybody tried removing the petcock assembly from the middle of the tank (above the sparkplug) and plastic welding the holes over, and moving it to the left hand side of the tank like on most other tanks?

would this method prove a winner for saving the trouble of moulding the tank inwards with heat therefor losing valuable fuel capacity??

im willing to try anything to try and retain the factory capacity of my Gen 4 tank!

Thanks guys, hope i can get some replies?
User avatar
Kuma
Posts: 854
Joined: February 7th, 2010, 8:26 pm
Location: Norco, Cali

Post by Kuma »

I have not heard of that being done but sounds like a good idea, you should do a separate build thread just on that mod, make sure to add a link to your thread onto this one.
Gen 2 AF, yes it's a SH, so I can call it an AF Damm it!
User avatar
Kuma
Posts: 854
Joined: February 7th, 2010, 8:26 pm
Location: Norco, Cali

Post by Kuma »

I didn't see this link on the post but this seems like a it belongs here :wink:
http://www.bannedcr500riders.com/board/ ... sc&start=0
Gen 2 AF, yes it's a SH, so I can call it an AF Damm it!
User avatar
other
Posts: 338
Joined: January 25th, 2010, 5:11 am
Location: Perth Hills, Western Australia

Post by other »

Trough Lolly wrote:In regards to the Gen 4 tanks,
Has anybody tried removing the petcock assembly from the middle of the tank (above the sparkplug) and plastic welding the holes over, and moving it to the left hand side of the tank like on most other tanks?

would this method prove a winner for saving the trouble of moulding the tank inwards with heat therefor losing valuable fuel capacity??

im willing to try anything to try and retain the factory capacity of my Gen 4 tank!

Thanks guys, hope i can get some replies?
With my 450X based Gen 4, I figured that it was only the spigot of the tank outlet that was fouling, not the body of it, so if I rotated it just a few degrees, everything cleared nicely with the BR8ECM plug, and no heat mods to the base of the tank, thereby retaining full factory fuel capacity. As the sealing mechanism is a round O-ring, this seemed feasible, and all I had to do was arrange a mechanism to hold the outlet hard on the O-ring. I fabricated this out of 1.2mm thick stainless steel sheet, and everything fitted perfectly. Been running it for a couple of years now, without any issues at all. Next time I have the tank off, I'll grab a pic and post it for you. It really is a far safer method than plastic welding up the outlet holes, and trying to bodge an outlet in a different location, not least because I still utilise the cast in brass inserts. I also found that other areas on the bottom of the tank were much thinner than the outlet location, and may not prove strong enough for the outlet. I swap the outlet backwards and forwards with an IMS 15 litre tank exactly the same as I could with the standard setup, ( my stock tank still holds just under 10 litres, so I only use the bigger tank once or twice a year, though it's nice to have the versatility).
o.t.h.e.r . . . . .Over The Hill Enduro Rider
vito.a
Posts: 49
Joined: September 16th, 2013, 10:15 am
Location: Tucson/Edwards AFB

Post by vito.a »

My 2007 CRF450 tank cleared, but again the fuel outlet pointed directly at the spark plug. I also have a CRF450X tank and it clears, but the same issue with the petcock.

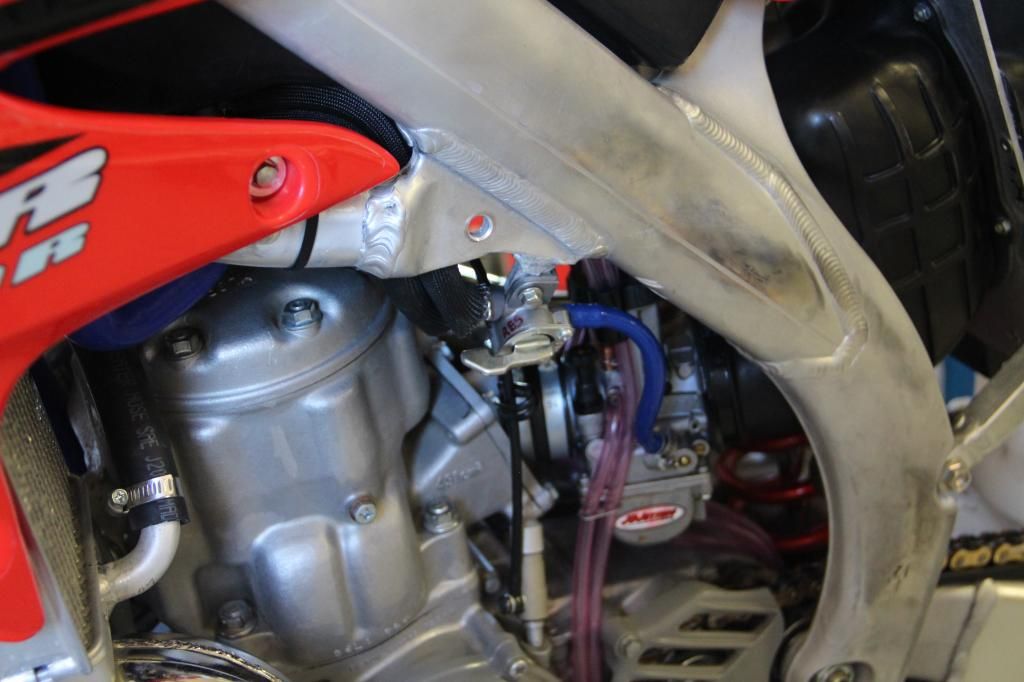
Easy solution: Rotate the fuel tank outlet 180 degrees so it faces the rear of the bike and relocate the petcock rearward on the frame about 10".
Bolt holes are symmetrical so everything lines up perfect. No heating or melting fuel tanks required. Look just above the red shroud and you can see the fuel line with a heat shield around it.
Image

Lots of clearance. Can easily change the spark plug.
Post Reply