Page 1 of 1
CRF250 and CR250 conversion work instructions
Posted: December 17th, 2012, 7:21 am
by Jercs
Hello all,
I have been putting together some work instructions on how to convert a CRF250 or CR250 using some of the parts I sell on ebay (my ebay ID is dzitting if you want to find the parts).
Main frame modification 02-07CR250, 04-09CRF250R, 04-12CRF250X:
http://cr500riders.net/conversions/CR25 ... uction.pdf
Exhaust 04-05CRF250R and 04-12CRF250X:
http://cr500riders.net/conversions/Exha ... RF250X.pdf
Exhaust 06-09 CRF250R:
http://cr500riders.net/conversions/Exha ... RF250R.pdf
Radiator modification for pretty much any model/year:
http://cr500riders.net/conversions/Radiator_CR_CRF.pdf
Coil mount fitting (all bikes):
http://cr500riders.net/conversions/Coil ... CR_CRF.pdf
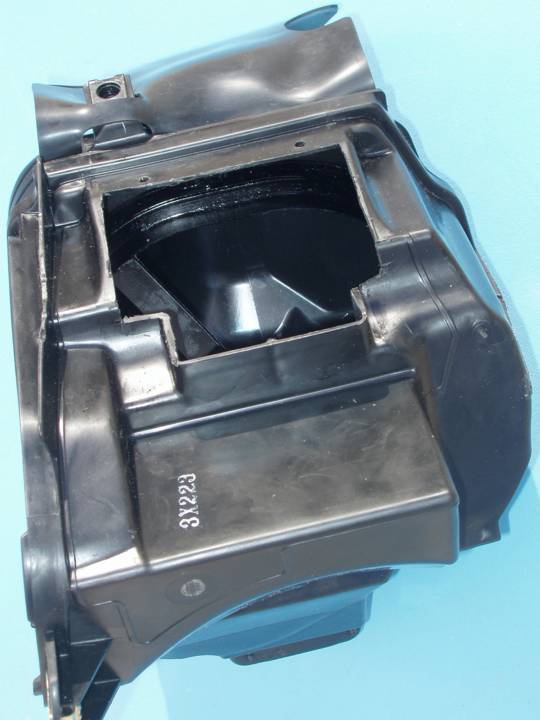
Airbox modification:
http://www.cr500riders.net/conversions/ ... RF250X.pdf
Posted: December 17th, 2012, 8:04 am
by AlisoBob
Those are awesome.... good job.
Thanks
Posted: December 17th, 2012, 8:19 am
by Jercs
Thanks Bob.
Posted: December 18th, 2012, 11:54 am
by AlisoBob
On some of your "Y"'s there is a post to index into the lower cradle tube, and on others there is a socket to go around the cradle tube.
I like the post better.
I'm thinking about building a new bike...
Question?
Can I get the post version, made for a Gen 5 bike?
Posted: December 18th, 2012, 2:01 pm
by Rhino89523
Are you thinking of building a new bike just for the fun of it? I might need to know what the going rate is for a well sorted Gen 3 modified for a gorilla....gorilla being a term of endearment of course.
Posted: December 18th, 2012, 7:50 pm
by Gmbond
Well written and good looking parts !!
Rhino - bobs bike is a gen4 if that's what your getting at...
Posted: December 26th, 2012, 2:27 pm
by Jercs
I added another work instruction to the first post in this thread. This one is for the radiator. I will keep adding new documents to the first post so new-comers don't have to scroll through all the posts to find the new documents.
Posted: December 27th, 2012, 10:55 am
by Mik329
good stuff!
Posted: December 27th, 2012, 12:03 pm
by AlisoBob
Jercs wrote: I will keep adding new documents to the first post so new-comers don't have to scroll through all the posts to find the new documents.
Make sure you note in the thread when you do.
Good job!

Posted: December 27th, 2012, 12:29 pm
by Rhino89523
Gmbond wrote:Well written and good looking parts !!
Rhino - bobs bike is a gen4 if that's what your getting at...
That is what I was getting at.....Bobs bike rode pretty dam nice, couple mini changes and that thing would be good to go for me. Get a nice soft Steely CR seat for that thing so I can couch it all day and you never know I might like it more than my pimp ass steely
Posted: December 27th, 2012, 3:25 pm
by AlisoBob
I'll build you a custom subframe to put a steelie seat on it for you Matt, but honestly, that Gen 4 seat aint too bad.
Posted: December 29th, 2012, 7:52 am
by Jercs
I just posted a link about the coil mount fitting. Here it is again:
http://cr500riders.net/conversions/Coil ... CR_CRF.pdf
Posted: December 29th, 2012, 8:00 am
by AlisoBob
Nice!!
Posted: December 29th, 2012, 11:33 am
by 2strokeforever
but honestly, that Gen 4 seat aint too bad.
i thought it was bad, but guts tall foam made it comfier than a steelie
Posted: January 7th, 2013, 7:24 pm
by Jercs
Here is the airbox modification work instruction. Hope ya like it:
http://www.cr500riders.net/conversions/ ... RF250X.pdf
Posted: January 7th, 2013, 8:48 pm
by AlisoBob
In the photo, you show a 250X airbox with the "snorkle" still attached.
The bike will not run at high power settings with this snorkle attached, it must be removed to allow the bike to get enough air....
T.V.O.E.
Bob
Posted: January 8th, 2013, 4:09 am
by scooter5002
Just a thought here. Go to MPS500AF.com. E-mail a link to that asshole on your fine work here, and put a "read"receipt" on it. Lol Then he'll have one LESS excuse for crankin out the SHIT that he does.
Nice job btw. That'll be a huge help to guys.
Posted: January 9th, 2013, 9:35 pm
by Jercs
AlisoBob wrote:In the photo, you show a 250X airbox with the "snorkle" still attached.
The bike will not run at high power settings with this snorkle attached, it must be removed to allow the bike to get enough air....
T.V.O.E.
Bob
Thanks Bob, I will have to give that a try.
Posted: January 10th, 2013, 7:13 am
by AlisoBob
It will go very rich after 3 or so seconds... you close the throttle for a instant to let the air "catch up" and your good for another 3 seconds at full load......
Removing the snorkle corrects that.
Posted: January 15th, 2013, 6:38 am
by Jercs
Cool, thanks for the image.
New instruction
Posted: March 8th, 2013, 8:57 pm
by Jercs
I just added another instruction that shows how to do the exhaust for the 06-09 CRF250R chassis. Here it is:
http://cr500riders.net/conversions/Exha ... RF250R.pdf
Posted: March 9th, 2013, 12:03 am
by AlisoBob
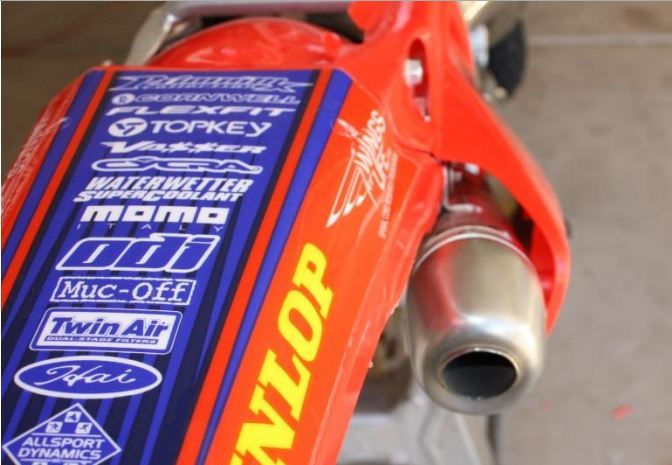
I gotta' chime in here....
This is how I hung my exhaust the first time. I was really unhappy with it.
1. As viewed from behind, it angles in and looks like crap.
2. With a large paddle or knobby, it hits the can at full suspension compression.
I remounted my silencer like this, and was MUCH happier with the result. Its more work, but doing it right often is.

Heres the silencer, mounted with twin mounts. Its parallel with the centerline of the bike.

I combined two head pipes to make a clean detour around the subframe

I left the little tabs on temporarily to give you an idea of the orientation.
This exhaust looks way better!!
Once its all welded, OEM baby...