2007 CRF450R Conversion using 2001 CR500R

Building Tips, Suspension Set Ups, Conversion Parts .... Build to your Heart's Content!
Post Reply
vito.a
Posts: 49
Joined: September 16th, 2013, 10:15 am
Location: Tucson/Edwards AFB

2007 CRF450R Conversion using 2001 CR500R

Post by vito.a »

Just started my 2007 CRF450R conversion.  I purchased the kit from CP500.  I found a new leftover 2007 CRF450R and will be using my 2001 CR500R as a donor.  I've had several CR500's since 1986 and the 2001 has been the best.  Unless we can find another donor we're tearing it apart next week.  


Pic of my 2007 CRF450R.  We rode it once before tearing it apart.  Image

Just stripped it down
Image

Original 450 engine, still looks new!  Anyone need a 4-stroke?
Image


Removed lower engine mounts
Image

Cut out original Y
Image

Comparison with CP500 Y.  CP500 Y is actually a much better part (cast vs billet).
Image

Starting air box conversion.  The CP500 kit makes it straight forward using a 99 CR250 filter and boot.
Image

Air box is finished.  CRF450 box, CR250 filter and boot with CP500 adapter plate.
Image

Ordered a Jig from Kevin.  Hopefully it will be here next week.
That's it so far.  Thanks to Brent at CP500 for the help!
vito.a
Posts: 49
Joined: September 16th, 2013, 10:15 am
Location: Tucson/Edwards AFB

More progress

Post by vito.a »

Made more progress.  Had to strip the CR500 chassis.  Needed the engine, CDI, coil, Magura clutch, and throttle assembly.  
Image


Notch in lower right CRF450 frame rail for CR500 clutch cover bolt.  It's interesting that the CR500 steel frame also has a notch here.  The Jig is very handy, but you need an engine, or case to mark the exact spot.
Update Apr 7: I had to deepen this clutch cover notch slightly.
Image


New CP500 headstay.  CP00 makes it relatively easy.  You bolt the motor in by the swing arm bolt (requires CR125 swing arm spacers), then rotate the entire engine up and back until the headstay lines up, then clamp it in place.  (Front of the bike is to your right.)  
Image


CR500 engine in place with CP500 Y installed.  This is after installing the Y and seeing that the frame tubes had moved after removal of original Y (the front motor mounts did not line up).  I had to remove the engine and the Y.  Then I had to heat the lower frame rails with a map torch and use a screw driver inserted through the motor mount hole in the Jig to move them into place.  Really only took about an hour to get it all lined up.  
Image


Trial fitting the new pipe (plus pic of the Boyesen Rad Valve).  I used a new FMF Gnarley pipe and FMF Q silencer.  I noticed most of the guys use Pro circuit pipes and sliencers, so I was concerned. I couldn't believe how well the FMF pipe fit.  I only remove 10mm from the small end of the pipe and about 20mm from the silencer junction pipe.  
Image

Need some time to finish fitting the pipe, the silencer, the coil mount and a skid plate.  Then weld everything up.  
Hopefully more next week.
Last edited by vito.a on April 7th, 2014, 8:52 pm, edited 2 times in total.
User avatar
gregrobo
Posts: 1064
Joined: April 18th, 2009, 8:47 am
Location: kalgoorlie, western australia

Post by gregrobo »

Nice build mate
only posties ride 4 stroke hondas
goldfields sheet metal fabrication
98 yzfr1
05 crf 500 race tech goldies
2010 rmz 500af
01 banshee
User avatar
Roostius_Maximus
Site Admin
Posts: 4641
Joined: November 16th, 2007, 3:24 pm
Location: Mt Nebo, Manitoba, Canada
Contact:

Post by Roostius_Maximus »

When welding in that Y you need to get some major heat to it, set the chassis on a heat plate with the Y down, get it hot, then puddle the Y before the tube so you get proper penetration. Bring the chassis temp down slowly on that hot plate once welded.
[/list]
vito.a
Posts: 49
Joined: September 16th, 2013, 10:15 am
Location: Tucson/Edwards AFB

Post by vito.a »

Thanks. I really appreciate the advice. This forum is a great resource.
vito.a
Posts: 49
Joined: September 16th, 2013, 10:15 am
Location: Tucson/Edwards AFB

Progress, plus wheel lacing

Post by vito.a »

Made some good progress this last two weeks. I sold the CRF450R engine, pipe/muffler, Carb, throttle assembly, kick start lever, shift lever, and complete ignition. This really helped the budget!
If you are searching for a donor CRF, I highly recommend a 450. The 450 engines seem to sell easily.

The frame is welded up with pipe and silencer mounts. Pretty easy after everything was pre-fitted.
I took the right radiator over to a friend and he is welding in the new hose bungs.
I dissembled the motor and took the barrel and piston down to the machine shop for boring.

I found a 450X fuel tank and trial fitted it. Looks like the strainer on the bottom will be close and may require some tank mods.
I ordered some new Boyesen Pro Series reeds to rebuild the Rad Valve.

Standard SAE bullet terminals will not fit CR500 wiring (they are too large). I found a source for the 3.5mm Japanese bullet terminals used on the CR500 and most Japanese built motorcycles. These are individual 3.5 mm male and female terminals. The ignition pulse generator uses a double bullet connector, but so far I have not located a double connector. These singles terminals will fit the double connector and you can use heat shrink on the connection to protect it. You will need 5 male and 5 female connectors to extend the CDI and coil wire (I recommend getting a few spares).
Image
This web site will sell you small quantities of 3.5mm bullet terminals: http://www.cycleterminal.com/bullet-terminals.htm


I also built up my own wheels. I’m using Tusk forged hubs, D.I.D. DirtStar rims (LTX 21” front, and original DirtStar 18” rear), and Bulldog Stainless spokes/nipples. This results in a very high quality wheel for around $300 each with your labor. The Tusk hubs are such a great deal they are back ordered so Adam and I split a complete Tusk wheel set.

First I installed new Pivot Works bearings and seals. Then I laced up each wheel. I like to lay the rim flat onto a table with a 2X4 on each side to raise the rim up and place the hub in the middle. Then lace one inside and one outside spoke in a pair. Make sure the outside spoke goes over top the inside one.
Hub with spokes
Image

Rear Wheel on stand
Image

Then trued each wheel on the Truing stand.
Front Wheel on stand
Image
After truing, I used a FASST Spoke Torque Wrench to torque each spoke down- starting at the valve stem hole skipping every fourth spoke, then the next set skipping every fourth, and so on. This is an exercise in patience.

Then grind the sharp edges off each spoke/nipple with a Dremel. Then install Rim locks, Rim Tapes, and finally mount the tire. I’m using a Dunlop MX71 on the rear and haven’t decided on the front yet.
Rear Wheel complete
Image

When you lace up Honda rear wheels, remember there are two different length spokes. 32 spokes total, 16 inside ¼” longer, and 16 shorter outside spokes. I recommend putting a mark on the tip of each inside spoke (hub end) with a Sharpie. That way you can check your work before you torque them down. I also recommend you start with the front wheel first. They are 36 spoke wheels and all are the same length. It will give you practice before you get to the rear.

I’m hoping to get my cylinder back from the machine shop this week and assemble the motor. This was a 2001 engine in very good shape. I’m only installing new piston/rings and some new seals in it before I install it in the new chassis.
Last edited by vito.a on April 19th, 2014, 9:39 pm, edited 2 times in total.
User avatar
hoofarted
Posts: 2628
Joined: July 2nd, 2007, 8:48 am
Location: Rancho Cucamonga, CA

Re: Progress, plus wheel lacing

Post by hoofarted »

vito.a wrote: I’m hoping to get my cylinder back from the machine shop this week and assemble the motor. This was a 2001 engine in very good shape. I’m only installing new piston/rings and some new seals in it before I install it in the new chassis.
Don't forget to relieve the exhaust bridge.
The CR500 is an acquired taste. If you don't like it, acquire some taste...

Image
User avatar
AlisoBob
"Hoon-father"
Posts: 15404
Joined: May 31st, 2007, 6:39 pm
Location: Aliso Viejo Ca

Post by AlisoBob »

Nice kit you used...

You new guys have it waaaaaay too easy!


:wink:
User avatar
hoofarted
Posts: 2628
Joined: July 2nd, 2007, 8:48 am
Location: Rancho Cucamonga, CA

Post by hoofarted »

AlisoBob wrote:Nice kit you used...

You new guys have it waaaaaay too easy!


:wink:
Almost like cheating. :lol:
The CR500 is an acquired taste. If you don't like it, acquire some taste...

Image
vito.a
Posts: 49
Joined: September 16th, 2013, 10:15 am
Location: Tucson/Edwards AFB

Re: Progress, plus wheel lacing

Post by vito.a »

Don't forget to relieve the exhaust bridge.[/quote]
Thanks, I also had to drill two oil holes in my new Wiseco piston in the exhaust bridge area.
vito.a
Posts: 49
Joined: September 16th, 2013, 10:15 am
Location: Tucson/Edwards AFB

Post by vito.a »

AlisoBob wrote:Nice kit you used...

You new guys have it waaaaaay too easy!


:wink:
I agree. CP500 does make it too easy. My brother wants to build a KX500 aluminum conversion but it looks really difficult, so I'm working on him to do a CR500 conversion instead.
vito.a
Posts: 49
Joined: September 16th, 2013, 10:15 am
Location: Tucson/Edwards AFB

More progress: April 15

Post by vito.a »

More progress on the bike last weekend.  I had so many parts when I got home it was like Christmas!
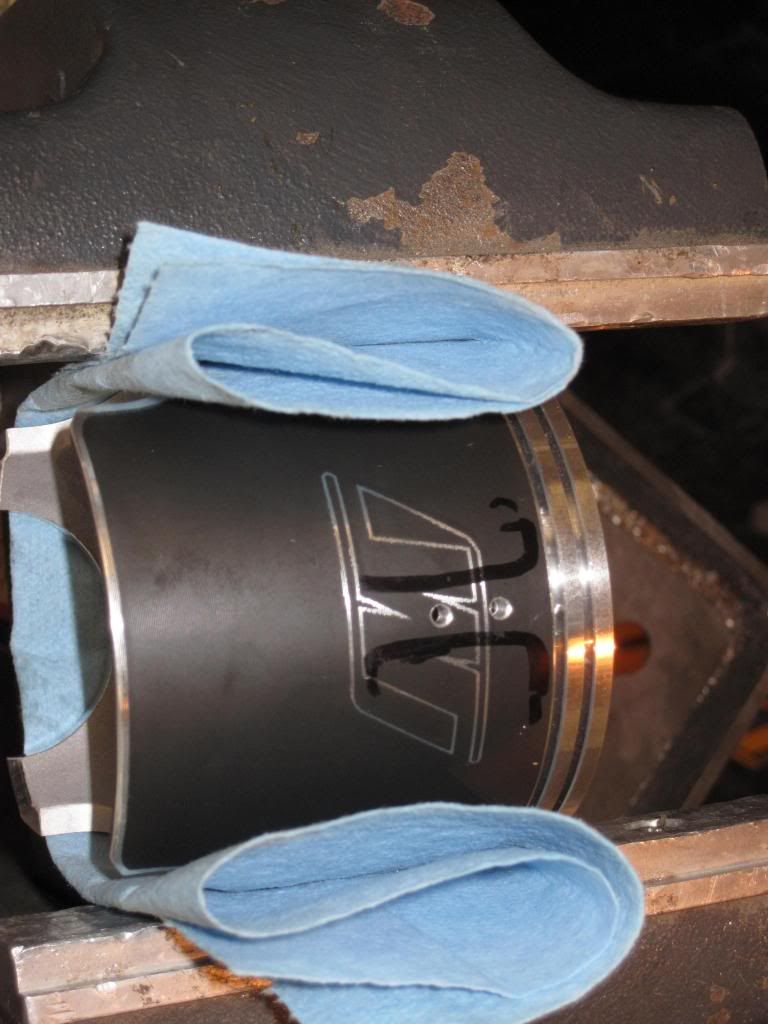
Earlier last week the machinist and I had a discussion with Wiseco about piston to wall clearance.  The Wiseco spec for the Pro-Lite piston is .0025”.  Most forged pistons are fitted in the .005-.007” range.   It was difficult finding someone at Wiseco that could intelligently discuss this.  They just say “Follow the directions”.  We decided to open it up slightly to .003” as the difference must be in the new coated skirts.  
My wife picked up the cylinder & piston from the machine shop for me so I was able to assemble the engine when I got home.  Another strange anomaly.  The Wiseco instructions have you drill two “oiling holes” in the piston where it contacts the exhaust port bridge.  You have to mock up the piston in the bore and trace the exhaust bridge outline.  Then mark the first hole .300” down from the bottom ring.  My old piston had them, so I set it up in the drill press and drilled them.  I thought it was odd that they were not pre-drilled.  
Image

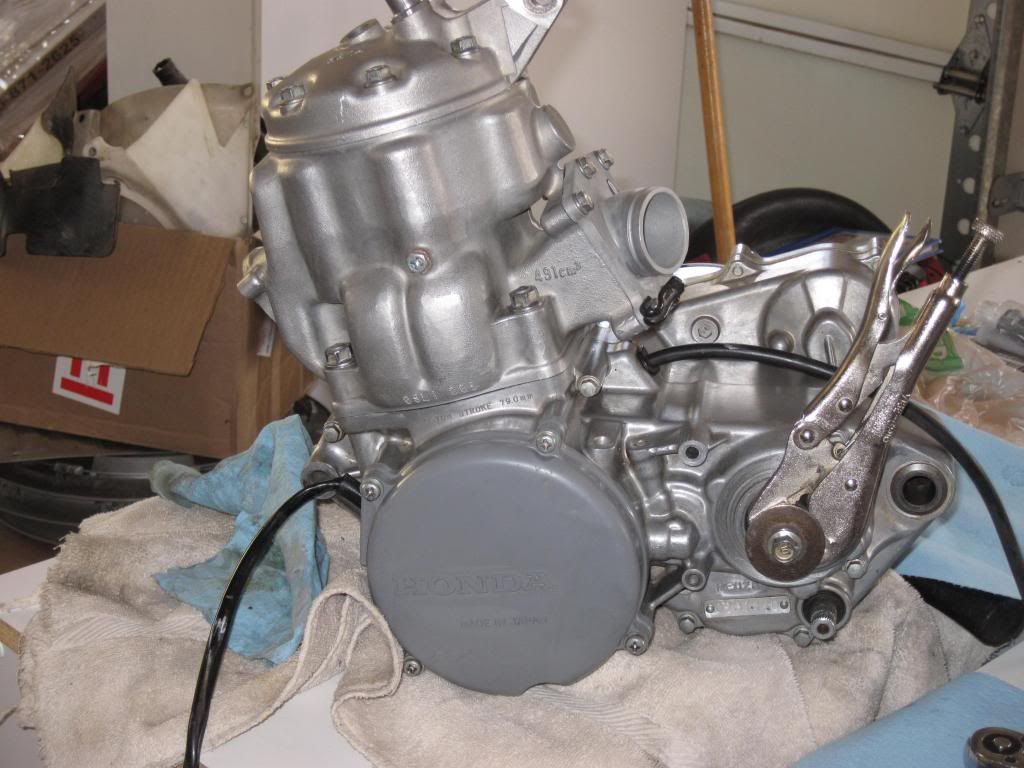
I had helped my son rebuild his new CRF250R earlier this year.  The CR500 is so much easier!  Everything is big and stout compared to the CRF250 and no valve train.  The CR500 barrel goes down easily over the new piston and rings.  
CR500 engine complete after top end rebuild.
Image

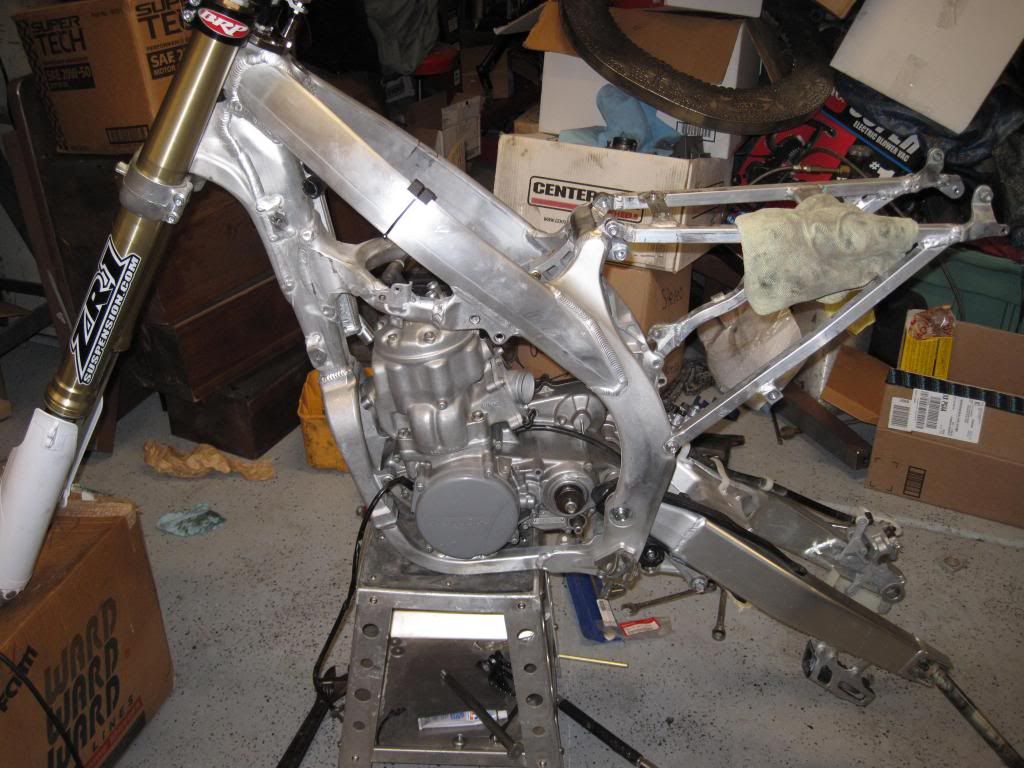
I also had the forks and shock reworked by Donny, our local retired RaceTech Pro.  We are lucky to have him in Tucson.  Last year we took my steel frame forks and shock to him and they are so good I almost didn’t start this project!  He says these will be better.  
Engine and forks installed in chassis.
Image

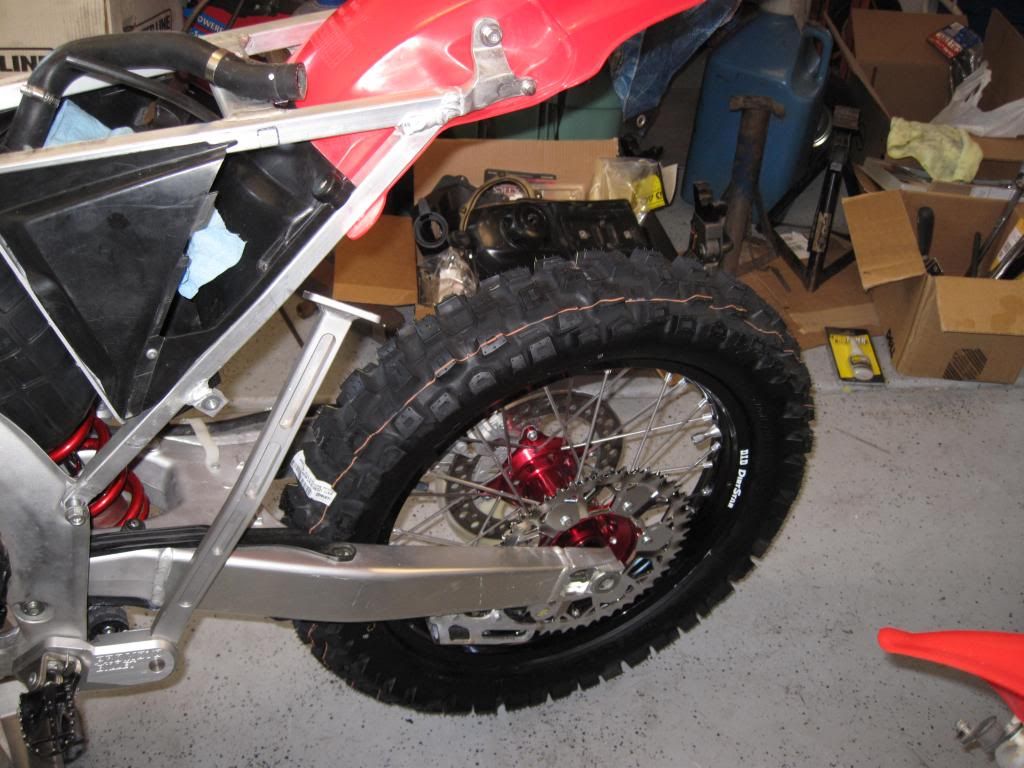
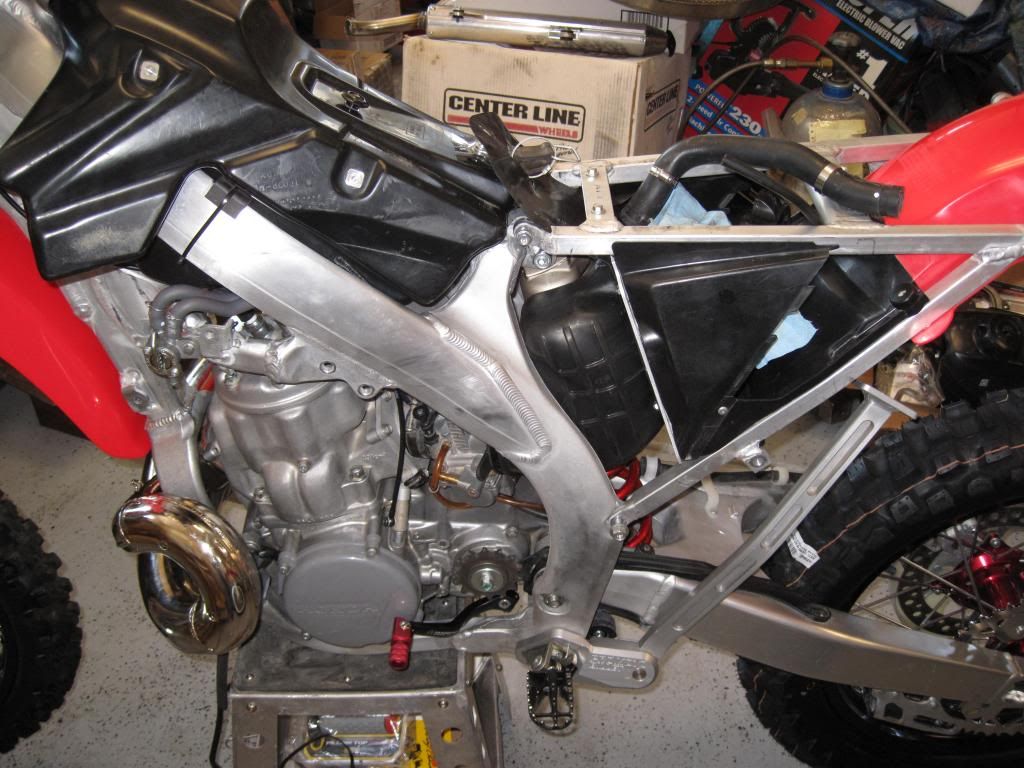
Air box, rear wheel, and fender installed.
Image

I didn’t realize the 450R brake lever wouldn’t fit.  The CR500 clutch cover is about .300” wider than the CRF450R and the brake lever hits the cover.  The CR500 brake lever has .300” wider pivot and longer pivot bolt, but the CR500 pivot bolt has a smaller thread than the 450 pivot bolt.

 Image

So I broke out the map torch and marked the lever, heated it up 1” from the pivot and bent it out 15 degrees and back in behind the toe piece.
Fits perfect now.  Later I found out the 450X brake lever has more offset in it and should fit.  Of course this was after I had taken a torch to my new lever!
Image

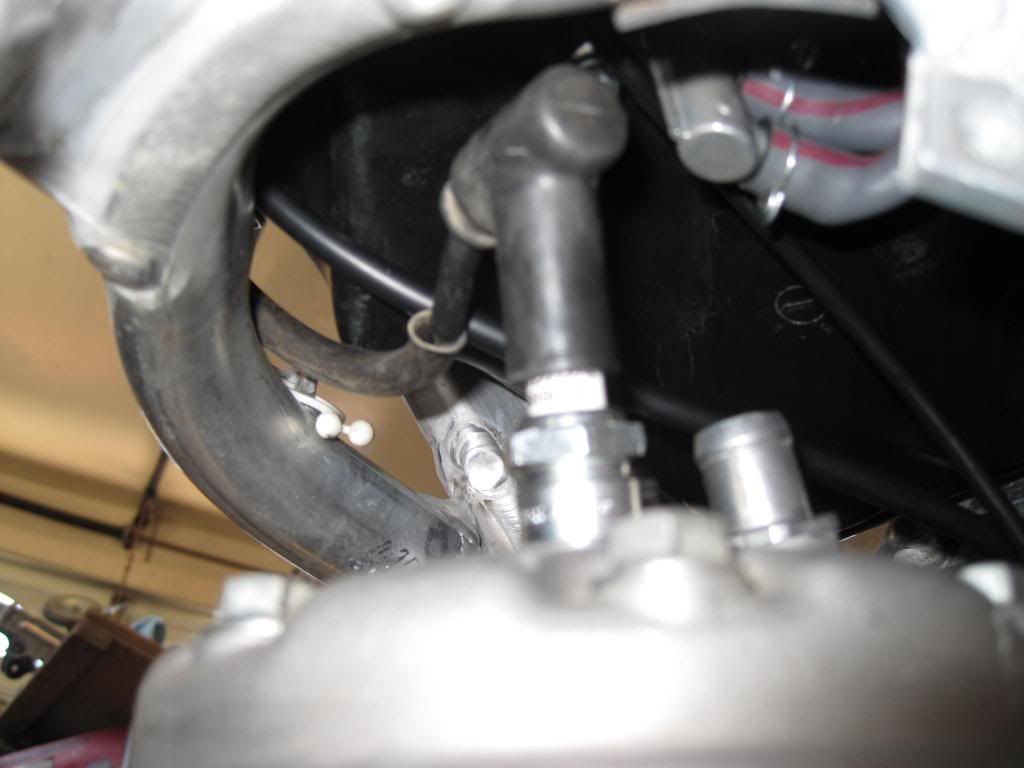
You can’t quite see it, but the bottom engine mount bolt is too short.  The OEM CR500 bottom engine mount bolt is 130mm long and the extra thickness of the aluminum mounts makes it a little short.  The 2007 CR250 aluminum frame bolt is 138mm long and works perfect.  

CRF450X fuel tank and reserve petcock installed.  In this picture, the petcock is actually mounted in the wrong position. It actually goes in the hole just below.
Image

I also used 450X fuel lines. The 450X petcock fits the 450R frame, but it’s turned 90 degrees.  
Image

I was concerned about spark plug clearance, but all I did was turn the fuel strainer around backwards so the fuel line exits rearward and it clears.  The 450R tank will also clear using the same method.  There is actually more clearance in the CRF450 chassis than there was in my steel 500 with a Clark tank.
Image

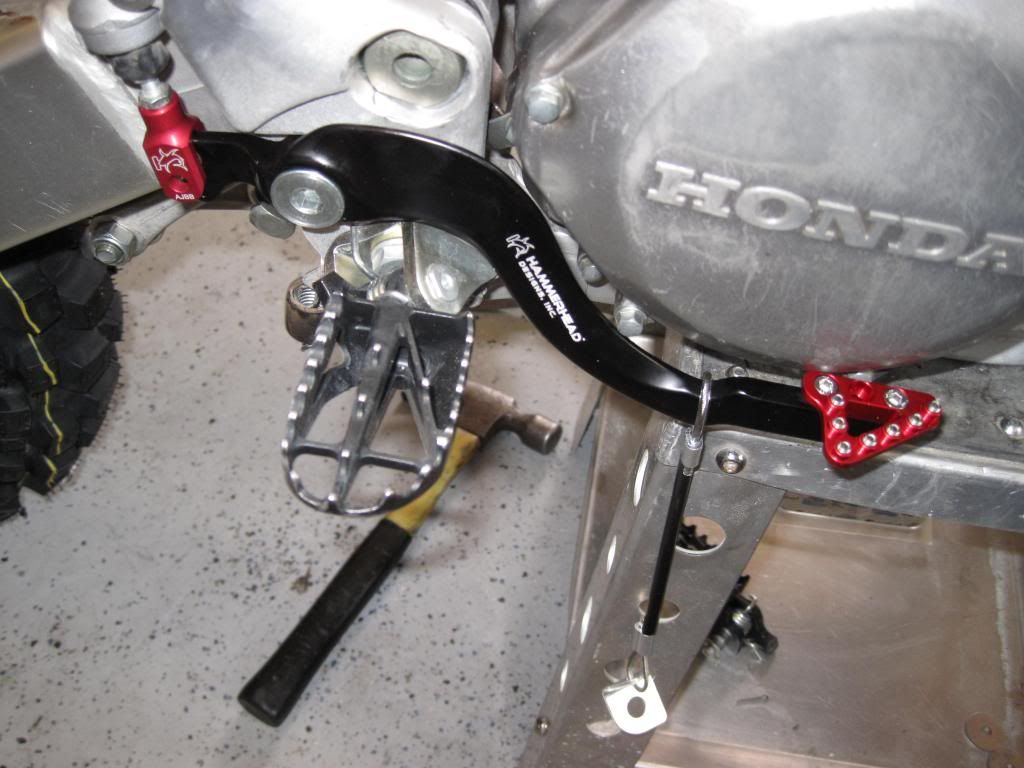
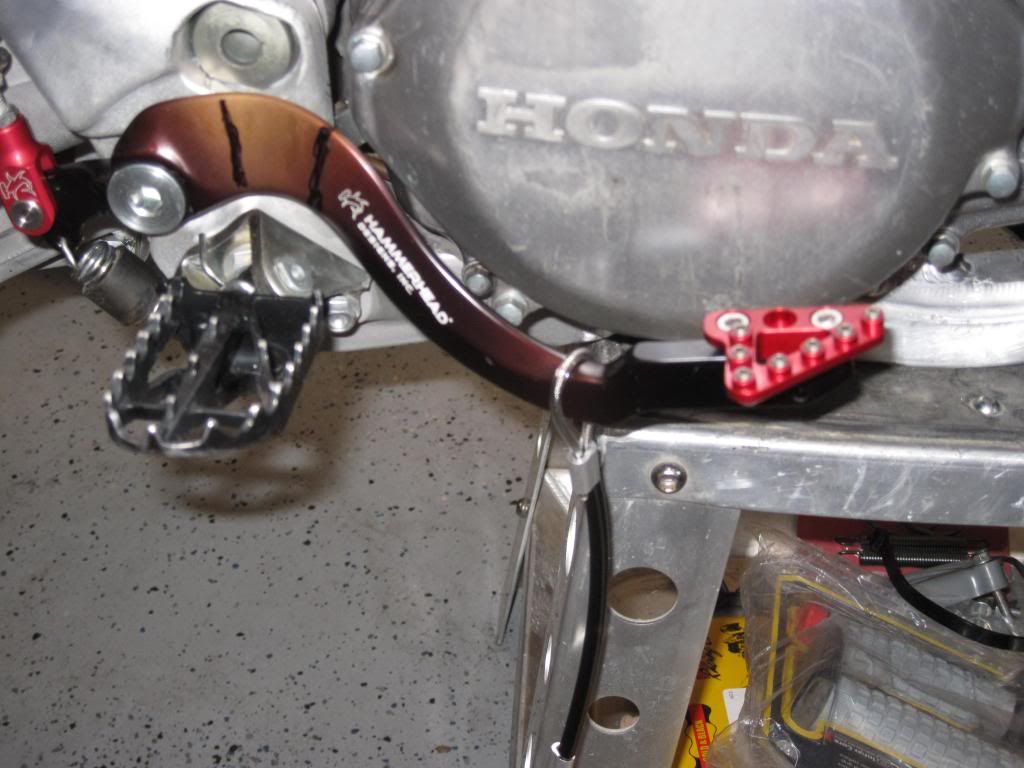
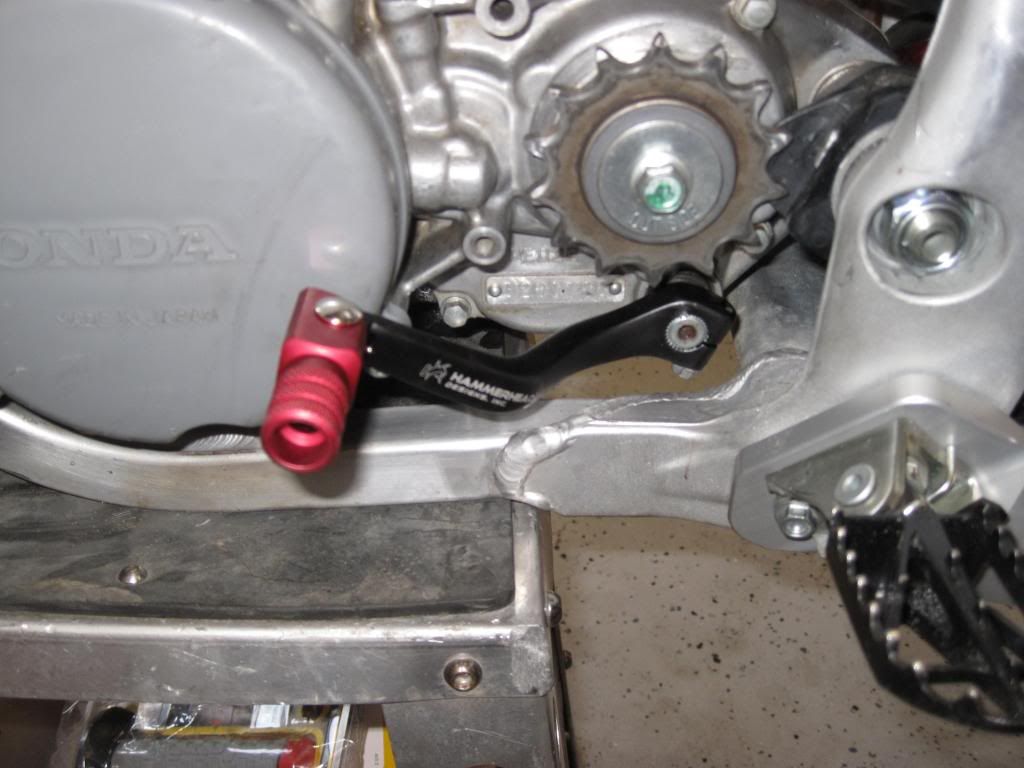
The aftermarket shifter was difficult to install.  The bolt must go in after it’s installed onto the shaft (the bolt fits through a groove in the shaft).  The frame rail is just below the shifter and the aftermarket shifter came with a very long bolt.  I thought I was going to have to remove the engine to get it on.  I tried the OEM CR500 shifter and it has a shorter bolt and I was able to get it on.  I used the OEM shifter bolt on the aftermarket lever and was able to get it in while rocking the shifter upward like shifting up to the next gear, but it’s extremely close.  (This is a CR250 lever).
Image

The carb fits perfect using the 98-99 CR250 air boot. I also installed new Boyesen Pro Series reeds in the Rad Valve.  Image

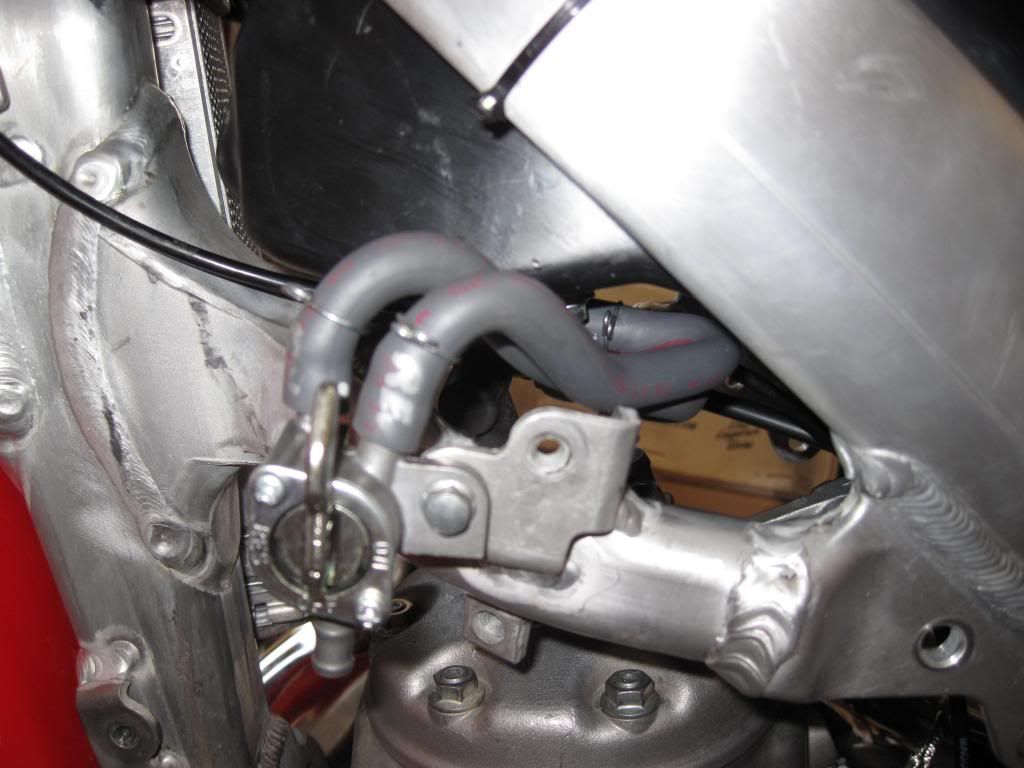
CR500 CDI installed in stock CRF450 location behind the front number plate.  I used the OEM 450 rubber mount.  Image

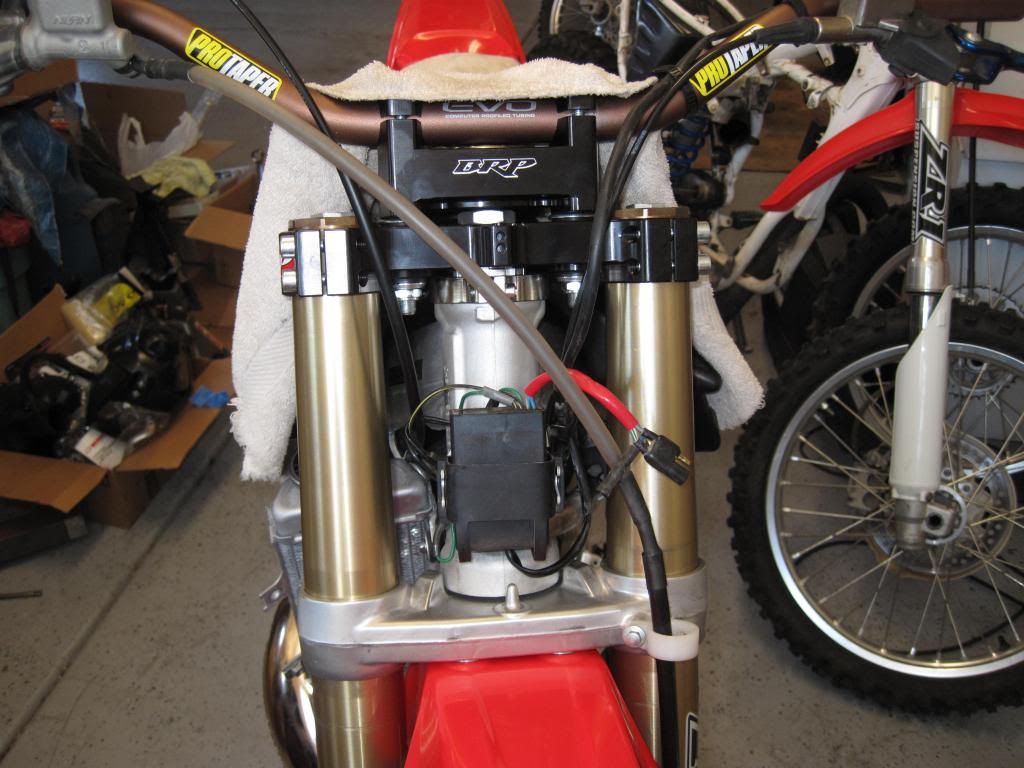
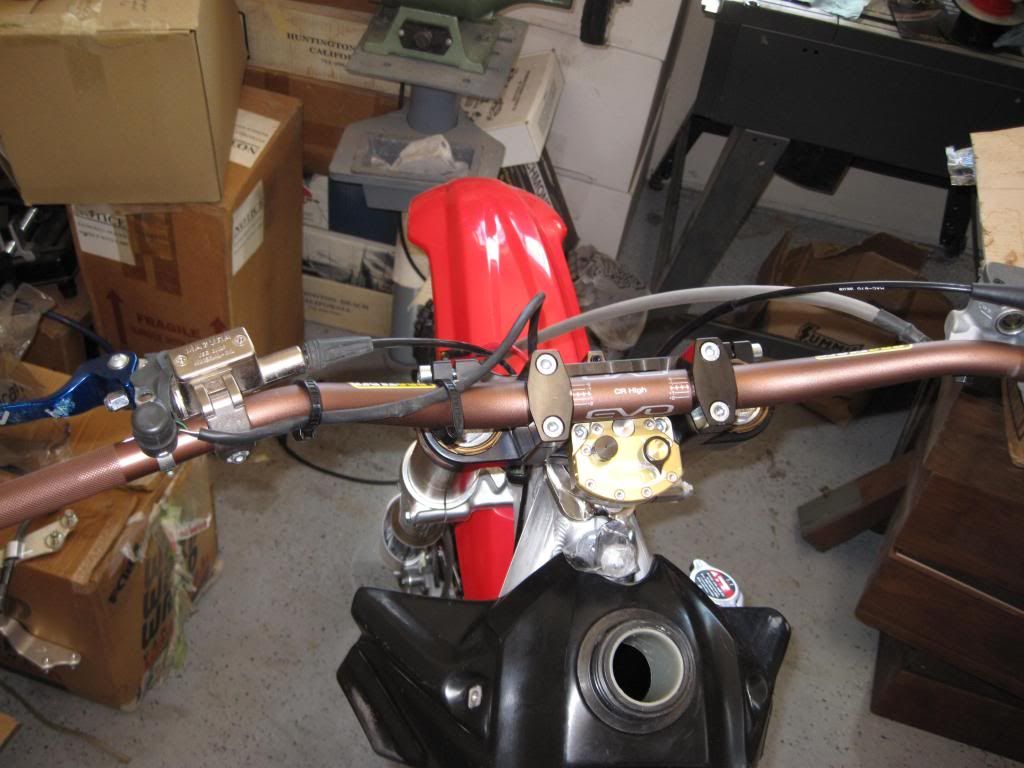
Scott’s stabilizer, Magura clutch, and Pro Taper handle bars installed.  I also rebuilt the throttle with a new tube, new wheel, and new cable.  I was going to use a Motion Pro throttle, but I wanted to stay with the same ratio.  Then I found out a new OEM CR500 throttle cable is only $14 online, so I stayed with the original throttle.
Image

My radiator hoses are still on backorder at Motohose.  Anyone know how to speed Steven up?
My levers are still on backorder at ASV.  Anyone know how to speed Arvin up?
I’m working on making a wire loom extension this week.  Adam is right about the CR500 wiring.  The bullet connectors are 3.5mm and are unique to Japan.  SAE bullet connectors do not fit.
Next week I need to install the chain, grips, new Rad Valve collar (it just never arrived),   left radiator, wire extensions, fuel line from petcock to carb, several other odds and ends and finally plastic.
Last edited by vito.a on May 18th, 2014, 9:40 pm, edited 1 time in total.
User avatar
AlisoBob
"Hoon-father"
Posts: 15404
Joined: May 31st, 2007, 6:39 pm
Location: Aliso Viejo Ca

Post by AlisoBob »

Looking real good!!!!
vito.a
Posts: 49
Joined: September 16th, 2013, 10:15 am
Location: Tucson/Edwards AFB

Progress 29 Apr 2014

Post by vito.a »

Made some progress last weekend. I’m still missing the Moto hose kit, levers, and the radiator shrouds. Buyer beware if you order from Partzilla. I placed an order Apr 4th and it has been in shipping status since April 10th. As of April 29th, I still do not have the order.

We added the chain, fuel tank, grips, kick starter, pipe and silencer, and completed the wiring. I also added the new Boyesen Rad Valve rubber boot, hour meter and several other minor items.

The most difficult issue was the radiators. Unless your radiators are new, I’d recommend buying an aftermarket set made to order. We spent an entire afternoon trying to sort through the issues between the CRF and CR500 radiator/hoses. The CRF radiator hose fittings are the wrong size and point in the wrong angle. I covered this in detail in another thread.

Anyway, the motor started up on the first kick. I went through the new break in procedure, so only ran it for 10 min each time. I was surprised at how easy it started each time. I guess cleaning the tank/carb and replacing the reeds really helped out.

Kick start lever and pipe fit well. You can also see the radiator hose routing. You can also see there is a lot more room in this chassis vs the original steel chassis.
Image

Chain lines up well.
Image

Left side radiator configuration.
Image


One last thing. I used the OEM CRF450 kill switch. It worked twice and then stopped working. When I ohmed it out, it was open when pressing the button. Do the newer kill switches not work on the older ignitions?

That’s it for now.
vito.a
Posts: 49
Joined: September 16th, 2013, 10:15 am
Location: Tucson/Edwards AFB

Post by vito.a »

Update May 18, 2014.  Finished up the bike last week. Everything except the MotoHose kit and graphics are done.  

I installed a new OEM CR250 throttle cable as the CR500 cable was too short with the handle bars turned full right.  The 2007 CR250 cable is about 2” longer and fits perfect.
I installed the longer CR250 lower engine mount bolt.  It fit perfect.  While I was doing this, I ran a 10mm reamer through all the engine mounts one at a time.  The bolts slide right in.  
I also installed a Fly Racing kill switch as the original CRF switch quit working.   I had some left over Japanese bullet wire connectors that made this go easy.  
I installed the IMS stainless steel foot pegs.  These are really nice and will spoil you.  
My levers finally came in.  The brake lever was a pain! Honda changed the lever design and ASV just made an adapter.  The pivot bolt had to go through 6 parts.  

I went to the motocross track with my son.  Put 1.4 hours on it.  It starts great on the 1st or 2nd kick.  

The front end is loose in tight turns in the deep loamy track soil.  The back end hooks up and it just yanks the front tire and I kept losing the groove.  I make it worse as I tend to ride too far rearward like I used to do with the steel frame.   I think I’m going to decrease sag before going out again.  I’m also going to change the AT81 front tire for an MX71.  
It really rips down the straights and through the wide turns.  It jumps much better than my old back will take.  I found myself tapping the brakes just as I crested some of the larger jumps to shorten the air.  

It gets a lot of attention at the track.  Almost all the bikes are now 4-strokes and this CR500 definitely sounds different.  Anyone that has the misfortune of riding just behind me had to come over and look afterward.  It will literally dig a trench in the soft stuff accelerating out of a corner.  

I had to raise the needle 2 slots to the 5th slot.  I’m now as far as it will go with a 170 main and a 52 pilot.  I’m going to try a 172 main and 55 pilot next time and lower the needle back 2 slots.  I’m also going to install the MX71 tire and decrease the sag.  

The only tragedy was the lower pipe mount bolt to the frame fell off.  I replaced it and used a nylon lock nut.  

Things I’ve learned during this project:

The 2005-2008 CRF450R makes a great conversion chassis.  The CR500 motor fits well in it and the CP500 kit makes it easy.  When we do the next one, I think we could finish it in just a few days.  

I should have used a CRF450X rear brake lever.  

Figuring out the radiators was the hardest part.  My radiators were new, so I stuck with them and welded five hose fitting to them; four.635” dia hose bibs (two upper inlets from the cylinder heads and two lower crossover fittings) and one angled larger dia fitting going to the water pump.  It now uses standard CR500 radiator hoses except for the 8” lower crossover hose and the original CRF450 upper cross over (which is useless).  
We probably will just use aftermarket radiators on the next one.  They are really inexpensive.  

I did not have to modify the gas tank for spark plug clearance. I just turned the strainer 180 degrees so the fuel lines exit towards the rear. This will work for both the 450R and 450X fuel tanks.

Make sure you add one of the nice CRF bolt kits to your list. It will save you time looking for a slightly longer or shorter bolt later.

A map torch, a dremel, and a reciprocating saw will take care of most of your fabrication chores.   You will also need a Tig torch with a small cup to get into tight places or a friend with one.  

I had to relocate the petcock to keep the tank to petcock hoses from kinking. See pictures.

I owe thanks to my son Joseph, Brent at CP500, Adam, MXdogger and all the other guys on here that helped me with advice.  

Image

Image
For those of you with a sharp eye, we reversed the masterlink clip.

Image

Image


Image

Image
Last edited by vito.a on May 14th, 2015, 7:58 pm, edited 1 time in total.
User avatar
hoofarted
Posts: 2628
Joined: July 2nd, 2007, 8:48 am
Location: Rancho Cucamonga, CA

Post by hoofarted »

Looks good! :cool:
The CR500 is an acquired taste. If you don't like it, acquire some taste...

Image
vito.a
Posts: 49
Joined: September 16th, 2013, 10:15 am
Location: Tucson/Edwards AFB

Post by vito.a »

26 May 2014 Update

Last weekend I installed a new 90/100-21 Dunlop MX71 front tire, decreased the sag to 102, installed new Helix fuel line, installed 172 and then 175 main jets, 55 pilot jet and adjusted the air screw.
I have a small lean spot from 1/8-1/4 throttle so I first tried lifting the needle. This helped, but the needle was all the way up with a 170 main. So I changed to a 172 main and lowered the needle back 2 slots. The lean spot was back, so I installed a 175 main and went from a 52 pilot to a 55 pilot. It is slightly better but still there if you roll into the throttle slowly. I’ve ordered two new Keinin needles that are 1-2 steps richer in the 1/8-1/4 throttle area. They are coming from Partzilla, so it will take a few weeks.

I also had a problem with the front end not tracking well in corners, so I installed the 90/100-21 MX71 front tire in place of the smaller AT81 tire. The new tire works great, just wished I would have bought it first. The bike is a lot more stable in tight turns now. I’m also thinking these bikes need the larger 100/90-21 front tire versus the smaller 90/90-21.
The original CRF450R fuel line was not long enough, so I installed a Helix fuel line from the petcock to the carb. I’m not happy with it as it’s very difficult to get over the hose barb fittings. The Helix fuel line is ¼” and I think I need 5/16” diameter fuel line. Rocky Mountain only lists the ¼” hose, so I’m going to have to do some research.

I took it out trail riding with my brother. He has a KTM 505 that is a great trail bike. Accelerating in lower gears the two bikes are fairly equal, but in 4th-5th gear the CR500 will pull away. The CR500 is traction limited in the lower gears even with a new Dunlop 120/90-18 rear tire. The CRF450R suspension is quite different than the KTM505. The KTM is silky smooth on small bumps, but rough on large ones. The CRF450R has more rider movement on the small stuff, but shines in the big stuff. Large jumps, ruts, and even big rocks are soaked up nicely. We also rode these bikes together before the CRF450R was converted, so this was a nice A-B comparison after the conversion. The stock CRF450R suspension was very rough and had me worried. However, after Donnie at ZR1 reworked the shock and forks, it is a drastic improvement.
I’ve learned that this bike is more sensitive to tires and suspension setups than the steel frame CR500. It also feels light. I did not weight it, but when you push it up the ramp into the truck and then push the KTM 505 up the same ramp, there is a big difference in weight.

I’m very happy with the bike. It does everything I want really well. I have already crashed once. I was going up a steep rocky trail and got high sided and the bike fell and dented the new pipe. Oh well! It’s fixable.
vito.a
Posts: 49
Joined: September 16th, 2013, 10:15 am
Location: Tucson/Edwards AFB

Post by vito.a »

I had an issue with the fuel lines kinking. This was caused by my turning the fuel tank bottom fitting rearward to clear the spark plug. I elected to turn the fuel tank fitting rearward rather than heating and deforming the bottom of the fuel tank (this was to clear the spark plug). The OEM petcock is located up front next to the radiator, so the fuel line had to make a 180 degree turn out of the bottom of the tank and then another 180 degree turn up front going into the petcock. As soon as they got hot, they kinked and cut off fuel.

Picture of the petcock relocated rearward and slanted inward. This makes the fuel line plumbing easier. You can also see the new JD Keihin 38mm Air Striker carb fits perfect. The Air Striker solved all my jetting and throttle dead spot issues.
Image


Picture of the fuel lines coming out of the bottom of the tank (just above the red shroud) . Flashlight is shining on the fuel lines covered with a black heat shield. There are two lines, on and reserve out of the bottom of the 450X tank. The 2006 450X tank fits the 2007 450R chassis quite well. (I used a 2006 450X tank because of the extra capacity. 2007 and newer 450X tanks are the same size as the 450R).
Image

New Stickman Graphics. This is my third try at graphics. Some of the other graphic guys cannot print silver or gray and they looked terrible. Alex cut the CR500 graphics in the same style as the CRF450R graphics and they fit perfect! I highly recommend Stickman graphics.
Image
vito.a
Posts: 49
Joined: September 16th, 2013, 10:15 am
Location: Tucson/Edwards AFB

Post by vito.a »

I've been riding this bike for a few months now. It is absolutely the best bike I've ever owned. I had read on one of the other threads that someone said all the conversion bikes were evil handling monsters. He's out to lunch! This bike handles great and I've ridden both motocross tracks and technical trails. It works well on both. The CP500 kit has now made building a bike like this reachable for most of us.

I also like the 450 chassis much better. I've ridden a couple of the 250 conversions and they are great bikes, but the 450 rake and trail are set up for a more powerful bike. The extra spark plug clearance and roomier chassis are a plus.

I also think its worth the time to route both cooling hoses from the cylinder head to the radiators (this requires new inlets on the radiators). It is hot here (Tucson) in the summer and several of the other guys bikes I ride with will over heat, especially in the slow technical stuff. This bike has never over heated. It doesn't even burp or gurgle after I shut it off.

I changed the trans oil yesterday and ran into a small issue. The drain hole I cut into the skid plate is not large enough. The CR500 oil drain plug goes in at a 45 degree angle and you really need an elongated slot hole. I used a Dremel with a small mill head and opened up the hole. The air filter box is a little tight but not any more difficult to service than the original CR500. I've had to retighten the spokes twice after some hard rides, but really overall the amount of maintenance required has been very reasonable. I use wheel bearing grease or blue Locktite on all bolts and they stay tight.

The new carb has made it much more tractable. It will idle along in a higher gear and pull most hills one gear higher. The pull from idle to full throttle is now linear with no large hit. The big thing is starting. This bike starts easier than the electric start bikes I ride with. Two kicks cold (four if I forget to turn the choke on) and only a single half kick when warm.
Did I say I love this bike!!
vito.a
Posts: 49
Joined: September 16th, 2013, 10:15 am
Location: Tucson/Edwards AFB

Post by vito.a »

Well, I've been riding this bike for just over 1 year. I've gone to a 120/100x18 Maxxis Maxx Cross Desert Intermediate Terrain rear tire. Wow, what a great tire. My brother and I were working our way up a canyon wash when we came up on a 12' rock ledge. It had a small step in it, but looked pretty rough. The other folks turned back, but I was able to ride up and over. The bike is so well balanced and the Air Striker carb makes it controllable which captures the low end torque. And this new Maxxis tire hooks well in desert terrain and rocks.

I've added the carbon fiber pipe guard which I covered in a different thread. It has saved me from tearing up the pipe regularly.

While loading my brothers KTM 505 and then my CR500 alum bike into the back of a pickup, my brother commented you can feel how light this bike is compared to the 4-stroke.

Since I sorted out the petcock, rear tire, and pipe guard I have not had a single problem on the motocross track or the mountain/desert trails. This bike does it all with finesse.
I would highly recommend using a 2005-2008 CRF450 for your conversion. If you avoid some of my mistakes, you could do the conversion in a 3-day weekend.
Ymerrick
Posts: 1
Joined: January 16th, 2016, 6:40 pm

Post by Ymerrick »

BEAUTIFUL im doing that exact frame in a few months. Were did you mount the coil ? You mentioned dificulty with the rads CP sells tubes and has a manual. What aftermarket rads do you recommend ?
vito.a
Posts: 49
Joined: September 16th, 2013, 10:15 am
Location: Tucson/Edwards AFB

Post by vito.a »

Welcome to the club! Coil location is somewhat dictated by the length of the spark plug wire. I mounted my coil to the bottom of upper right frame rail next to the gas tank and just behind the right radiator. The CP500 kit comes with a coil mount. Just face the wires towards the rear.

I made another thread on radiators. My CP500 directions only described the down spout required to the lower right radiator. At the time, CP500 didn't even sell a weld on outlet, so you had to cut them off other radiators. I slowly unraveled all the new outlets required on my own. I think IF your original CRF450 radiators are in good shape, convert them. If not, then buy some of the aftermarket ones from China and specify the outlet configuration.
Also, welding on radiators is almost an art.
Best of luck!
Post Reply