miller diversion 180

miller diversion 180
im thinking of starting a AF build in the near future, and i would like to do it all myself. I am new to tig welding, i have a miller diversion 180 and i'm getting pretty good at welding steel but haven't done allot of aluminum yet. i was wondering if anyone could give me a real world opinion as to wether a 180 watt welder can handle the "Y" section on one of these conversions or not. i'm pretty sure technically the answer is no, but i've gotten away with welding steel that is much thicker that this machine is rated for and i'm hoping i could do the same on aluminum. any advice would be greatly appreciated. thanx.

Aluminum welding is a little trickier, I don't do it myself but get some simular metal and practice practice practice, when you are happy with the results, then start on your project. I would also suggest that once you are satisfied with your skills, do another practice bead just prior to starting to get yourself warmed up.
good luck and let us know how you're doing
good luck and let us know how you're doing
-
87CR500Rider

- Posts: 168
- Joined: January 4th, 2008, 7:47 am
- Location: San Antonio, TX
tig
Clean weld areas. Just prior to welding (oxidation)
Have a set of clean (aluminum only) tools for welding AL as well, files, brass wire brushes, non-lint rags. Do not use brake cleaner for cleaning (do research why)
Have a set of clean (aluminum only) tools for welding AL as well, files, brass wire brushes, non-lint rags. Do not use brake cleaner for cleaning (do research why)
2002 CR500 AFC
FMF fatty, V-force, 39PWK, Dyno Port engine, EGT
FMF fatty, V-force, 39PWK, Dyno Port engine, EGT
I've never used one of those, but it should be no problem.
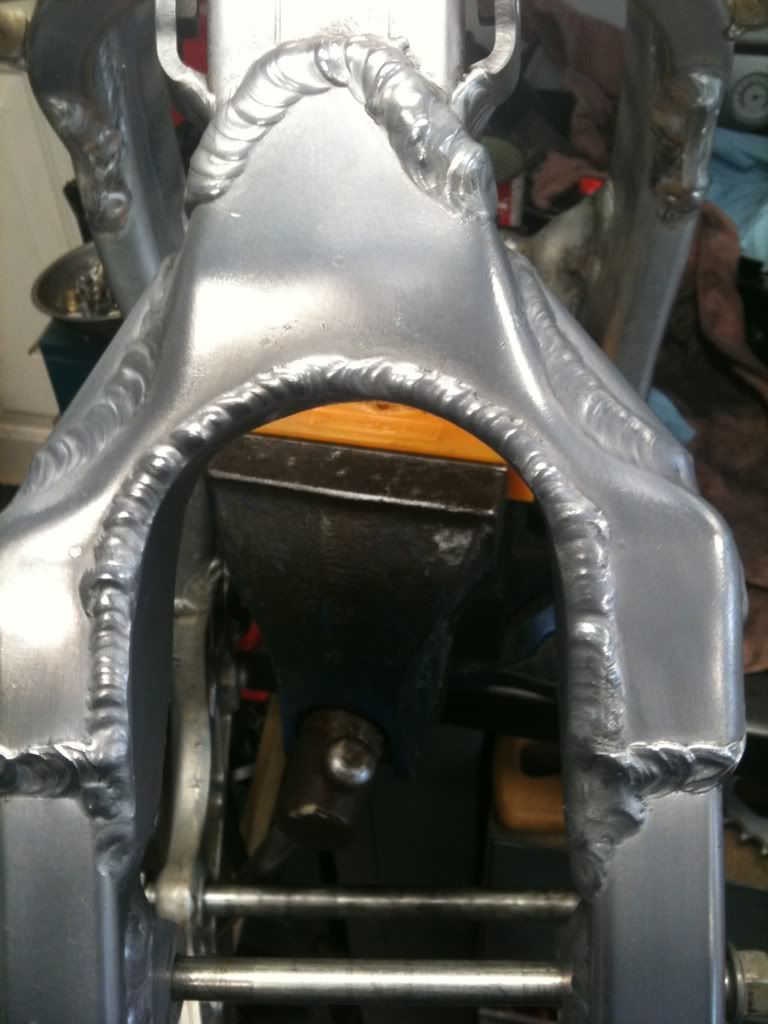
The down tube is not particularly thick, in fact, I think it gets thinner as you go upwards on it.
You may have to pre-heat the frame - especially at the SA pivot / peg plate if you are replacing the full cradle, or , if you are doing the basic lift the Y and insert a section, if you use a solid insert, pre-heating may be neccessary.
I've never pre-heated frames before welding, but I use a higher spec machine. Going apeshit with a torch, or an oven, basically defeats one of the key points of TIG, minimal HAZE zones. Especially with light tube fabrication that an AF represents. If it wont tack without pre-heating, you can simply use the welder to pre-heat, running along the junction, with the torch arc favoured to the section that is posing the problem - 1/8" tube should present no problem itself.
By the way, I've been TIG welding since my early teens, when I made my first frames - I'm now 51.
Different gases give different effects, to. Very marked effects, a bit of research will help you there. Here in OZ, I long since stopped stuffing around with gases other than our pure argon. You blokes use Helium, it's what you have in the US - no idea if that is better or worse than Argon.
As I said, I've no idea of the real capabilities of the 180 - it may be limited by its duty cycle, but, basically, if your doing your AF in the most common way, your only doing about 30" of weld bead, so it might not trip it.
Another limitation is the heat that the Much higher amperage will put into the torch and the line, assuming you've got an air cooled torch, but, once again, you are only doing short welds.
Get a buch of scrap, and practice, practice, practice, practice - then practice again. Try blatantly low amperages, and blatantly high amperages - and everything in between, it will give you a real feel for what is happening when you go to do the job itself.
Practice will show if you need to mess with pre-heating, due to your machine. It will also show you how little pre-heating you need even then, as the alloy pieces heat so quickly. Most of the time, the tack process gets all the heat you'd ever need in jobs like this.
If you have the foot control, it's much easier. You'd easily just be able to set the max amperage near the max adjustment, and 'lift off' the pedal as you weld. You'll be surprised at the amount you can / have to back down on the amps with alluminium, if you've only done relatively thick steel (as in 1/8' in steel, equal to that you'll probably be dealing with on the alloy cradle rails - 1/8 is thick to me in steel, as I deal with a some bicycle tubing that is as thin as .2 mm [.00788"] ). I'm starting to find that a bit difficult as my eyes sight and steadyness diminishes, sucks getting old. Though a strong Bourbon helps with those sort of fitments.
What you are welding is not hard to do at all, and you can position the frame easily to have great access to each weld, so no weird angles or approaches will come into it. Material prep, is of utmost importance. Clean, clean, clean joints.
'Tip Dipping' is something to avoid, and the rod needs to be held further away from the puddle, to avoid it just melting itself, but we are talking distance differences of mms here. And, as you've found, no 'colour change' at the weld puddle that you'll be so used to with ferrous metals.
Do you have the correct Tungstens?, the correct Collets and Cups?, The correct weld rods? Know the extension of the tungsten out of the cups? Check out Millers website, that, and Lincolns (which I think is even better) has aLot of welding tech advice you can look up. Check The Sites Out!
Alloy beads are much bigger, so that makes laying a bead easier, than minute, thin section steel /Ti beads.
Should be no problem, basically.
Re: tig
Brake cleaner + arc welding = nerve gasIceman wrote:Clean weld areas. Just prior to welding (oxidation)
Have a set of clean (aluminum only) tools for welding AL as well, files, brass wire brushes, non-lint rags. Do not use brake cleaner for cleaning (do research why)
wow you guys are great! thanx for all the advise especially bearorso. i think i have all the correct collets and cups, and i have several sizes of aluminum rods to play with. i've actually repaired a couple radiators for sport bike buddies. the first one was real scary but easier than i would have thought. i need to get back on miller and lincolns websites and do some more research like you say, i'm a little rusty. i haven't wanted to do much in my 120 degree shop the last few months  one thing i'm having a hard time with is material to practice on. i work in the aviation industry and we have lots of scrap AL but it is all 2024 or 7075 both of which im told is not weldable. i have an old gixxer frame out back, but i'm not really ready to cut it up. any ideas?
-
87CR500Rider
- Posts: 168
- Joined: January 4th, 2008, 7:47 am
- Location: San Antonio, TX
Here's a good site. http://www.weldingtipsandtricks.com/
-
87CR500Rider
- Posts: 168
- Joined: January 4th, 2008, 7:47 am
- Location: San Antonio, TX
Home Depot or Lowes carries 6061 aluminum.bookie60 wrote: one thing i'm having a hard time with is material to practice on. i work in the aviation industry and we have lots of scrap AL but it is all 2024 or 7075 both of which im told is not weldable. i have an old gixxer frame out back, but i'm not really ready to cut it up. any ideas?
-
"SOLID Bro!!"
Running that machine is going to be tough. I use a syncrowave 250 at work.
Awhile ago I tested a miller econo-tig. 220v On a 50 amp breaker.
It didn't work, I don't care how little welding, all you have to do is get it into the duty cycle of the machine and your done.
This particular machine, (on 1/8 alum sheet) It would weld approximately 4 inches and the breaker would trip, second try same thing, third try, the machines thermal breaker would trip and shut down the machine.
So us "blokes" here use helium to repair aluminum blocks and heads (automotive) or weld thicker material without the cost of a huge industrial machine with a 100 amp breaker.
You can try to use a 50/50 mix of helium/argon or straight helium. It will allow a hotter weld but it is inconsistent and won't flow like a good tig bead does.
Preheating in my opinion will help but don't focus your heat in one spot. You need to heat the whole frame. Aluminum transfers heat so fast that you can't heat locally and expect the weld to flow properly.
This is just my opinion, I'm not an aerospace welder. Nor is you AF the space shuttle.
-
cryzsurfer
- Posts: 91
- Joined: December 28th, 2008, 12:16 pm
miller diversion 180
When limited by the machine and circuit breaker you can do what was stated in mixing the helium, or you can switch to DCEN or Straight polarity which is what is used to weld steels, titanium and other hard alloys such as nickel bearing alloys. With DC on aluminum you use 100% helium and if you can afford it use .999% pure helium as you can see the difference compared to baloon grade gas. As with any welding practice.... When using 50xx alloys and filler it is much harder but the AF frames weld nicely on DC. I welded my AF on DC for the hot passes to tie in with the backing stock then took it to work to weld on my new Dynasty on AC for the cosmetic cap. Just give it a try and you'll have to turn up the gas flow. We scrape the oxide off aluminum using a three sided deburr tool for all class 1 welds as you don't get any cathode cleaning action like you get with AC and argon. About 75% of the aluminum I weld at work is done with DC. Just give it a try and see what you think.
Craigus
Craigus
I used a Lincoln 175 Tig, although I was doing a gen3 so there was no cast pieces and I wasn't doing rail replacements.
I'm pretty happy how it turned out, I had the machine fairly Maxed out for good penetration, and trying to get some nice cosmetics also.
I also used the 175 for my bike tie down bar (re-inforces and gives tie down spots at the front of my truck box) and while it was 1/4" thick 6061 I was able to do some nice welds.
Be nice, but helpful criticism is always appreciated. Lol[/list]
which frames are "gen3"? it looks like you didn't have to replace the "y". is that correct? just opened it up, braced it and move it? i'm trying to figure which frame would be easier for a newbie. i'm planning another project that is going to be a 450 motor in a cb350 frame cafe style. so if i used the roller for my AF conversion i would be killing two birds with one stone.
service is the problem. i had my eye on a few synchrowave machines at a fair price until i did some research on the amp draw. those things suck so much amperage i would have been spending more on service upgrades than the welder. i went with the 180 for now because it's an inverter type machine and draws way less. it's just fine for the steel stuff i bought it for. thick aluminum may be a stretch. i'll find some stuff to practice on and i'll let you guys know.
The frame i did is a gen3 cr250 two stroke. The gen3 four strokes have an oddball Y that doesn't appear to be nice to work with. The gen3 125 requires major rework to be used.
Two stroke gen3 are 2002-2007
Four stroke gen3 is 2002-2004 I believe
The nicest factory Y are on the gen4 frames and it would be tempting to buy a junk frame off of eBay for $50 just to cut the Y out and use it along with new rails.
Two stroke gen3 are 2002-2007
Four stroke gen3 is 2002-2004 I believe
The nicest factory Y are on the gen4 frames and it would be tempting to buy a junk frame off of eBay for $50 just to cut the Y out and use it along with new rails.