Blue Honda plastic ? ?
-
cr5004life
- Posts: 38
- Joined: March 4th, 2008, 6:56 pm
- Last active:
Blue Honda plastic ? ?
Does anybody make blue plastic for the Honda bikes ? It seems like i can remember seeing a picture of a gen 3 with blue plastic, but i cant find it anymore. Any help is appreciated, thanks guys
-
Roostius_Maximus

- Site Admin
- Posts: 4641
- Joined: November 16th, 2007, 3:24 pm
- Last active:
- Location: Mt Nebo, Manitoba, Canada
- Contact:
Cycra was supposedly going to make any body in any color. I have part numbers from the catalog they'd sent, but they never followed it up as far as i know
http://www.youtube.com/user/500bigbore
My CR500 Tech Reference... http://sdrv.ms/1a0CIiz
MRE Components... http://sdrv.ms/1bs2zhd

My CR500 Tech Reference... http://sdrv.ms/1a0CIiz
MRE Components... http://sdrv.ms/1bs2zhd
-
kelroy_leon

- Posts: 381
- Joined: May 26th, 2009, 9:47 pm
- Last active:
- Location: Sacramento CA

 "the game of life of is not so much in holding a good hand as playing a poor hand well"
-
100hp honda
- Posts: 4394
- Joined: July 4th, 2007, 6:57 pm
- Last active:
-
cr5004life
- Posts: 38
- Joined: March 4th, 2008, 6:56 pm
- Last active:
-
kelroy_leon
- Posts: 381
- Joined: May 26th, 2009, 9:47 pm
- Last active:
- Location: Sacramento CA
this is something i found and was thinking of trying for my xr to go from orange to red again.
I don't know if it works, but it seems like a good idea.
Original post:
http://www.thumpertalk.com/forum/showth ... p?t=609552
* Mods want to edit this and put it in another forum section as this write up can benefit many TT users and not just Yamaha 2 strokers. The reason why I started here is because I wanted the 2 stroke YZ community to know that I am contributing to the section.
HollywoodMX's Processes on dying a gas tank black for around 30 bucks. No Painting!
I had some trial and error to perfect this but I can safely say you CAN dye a gas tank 100% successfully with color penetration past the visible layer, so if you scratch it it will be black underneath. Anything you have read from other sources, disregard it as I did. I feel like a revolutionary proving this, I hope IMS and Clarke don't try to assassinate me. LOL.
The only tank I have tried this is on is a blue Yamaha YZ tank. I'm pretty confident the other colors will take the black well like the Honda red, and the Suzuki yellow, with the Kawasaki green possibly being a challenge. Clear tanks could go either way, could go purple/grey instead of black.
Ok this is what you need.
A large enough container plastic, metal, what ever to hold the gas tank in an UPRIGHT POSITION and not on it's side, this is important. So go to wallmart, home depot where ever, the tighter fit width wise the better. The container must be able to hold mass amounts of boiled water. Think of its size to your tank. The closer in size the container is more concentrated your dye will be due to needing less water to fill it over the tank. I used a plastic garbage bin. Cost 14 bucks.
12+ boxes of Rit dye. The ratio on the box is 500ml per box. It does not have to be that concentrated IMO. Cost 1.77 per box @ Wallmart.
Rubber gloves/dish gloves.
As many pots and kettles you can heat water in.
Garbage bag.
Optional expansion support. Meaning when you fill a large plastic container the heat makes it flex out ward. So I put heavy stuff around it to stop some of the flexing.
Vinegar
Salt.
Dye mixing container.
The process:
1. Empty the gas tank. Rinse it once. Leave over night with gas cap off. 1 day is more than enough.
2. Clean tank with dish soap or car wash soap, I also used some simple green on it before the soap.
3. Optional. Don't sand the tank, it will show small abrasions, use a heat gun to restore some of the minor scratching. You can tell as it goes a shade darker when doing it. Thanks "RCannon", this actually made a difference in the dye process, the tank looked much better after this.
4.Start boiling water and use salt in the water, you don't need a burner or a pot to keep the tank in to boil. It's unnecessary. I used two pots and a kettle and made several fill trips to the garage.
5. Put the tank in your sink. Fill the tank with boiling water all the way to the top and put the cap on.Plug the vent hole. I used a small piece of clay bar.
Note: One thing to remember is especially when the tank is hot, it will scratch really easy be mindful of that when working with it.
6. Fill the sink up with the taps hottest water and let the tank sit in there till you get your tank bucket filled.
7. Fill the bucket with the boiled water, a cup of vinegar and 2 table spoons of salt, fill the water enough to cover the whole tank if it was submerged, BUT without having the tank in it, just guess. Use the lid of the bucket and a garbage bag to seal the heat in between fills. The garbage bag makes a difference to keep the heat in.
8. Mix dye in a separate container with boiling water.
9. Add dye to water in bucket, mix with a stick.
10. Empty all of the water in the gas tank.
11. Put the tank in the bucket with the gas cap off let the dye mix fill the inside of the tank all the way to the top, you dont want any air in the tank to cause it to float if possible, then screw the cap back on. the water level should be above the tank by a little. Yes inside the tank! Let the color penetrate from both sides. I see no issue with this what so ever. Even if the gas removes the dye on the inside over time, who cares. Understanding combustion this not effect the engine what so ever.
Note: If your tank keeps floating, take a ziplock freezer bag with tap hot water fill it and leave an air pocket and let the bag keep the gas tank under water.
12. Then put the lid on with the garbage bag and come back to it in 24 hours or more. You will likely be surprised but the water will still be warm after the 24 hours, my garage has heated floors mind you.
13. Next day it will be black, if not quite black enough leave in for another 24 hours! Sweet!
14. When done rinse it with water and wipe it down a couple times. It will have some dye residue on it. Make sure you wipe it down with items that are not abrasive.
15. For final fit an finish you could buff it to make it shine. I used a small amount of liquid Meguiars wax. For products I would be careful not to use anything that will prevent graphics sticking to it. After graphics I would spray it with rain ex/rain guard or something that give it a little protection.
My dye setup.
http://members.shaw.ca/eurotrash/GAS1.JPG
Tank after 24 hours wet.
http://members.shaw.ca/eurotrash/GAS2.JPG
Tank after 24 hours wet 2.
http://members.shaw.ca/eurotrash/GAS3.JPG
Tank dry from wet with no wipe down.
http://members.shaw.ca/eurotrash/GAS4.JPG
Tank after light wax.
http://members.shaw.ca/eurotrash/GAS5.JPG
Tank on the bike. You can actually see the tank is darker than the air box and the black area near the side number plate. This should be a good hue comparison.
http://members.shaw.ca/eurotrash/GAS6.JPG
- HollywoodMX, Adrian DiMarino.
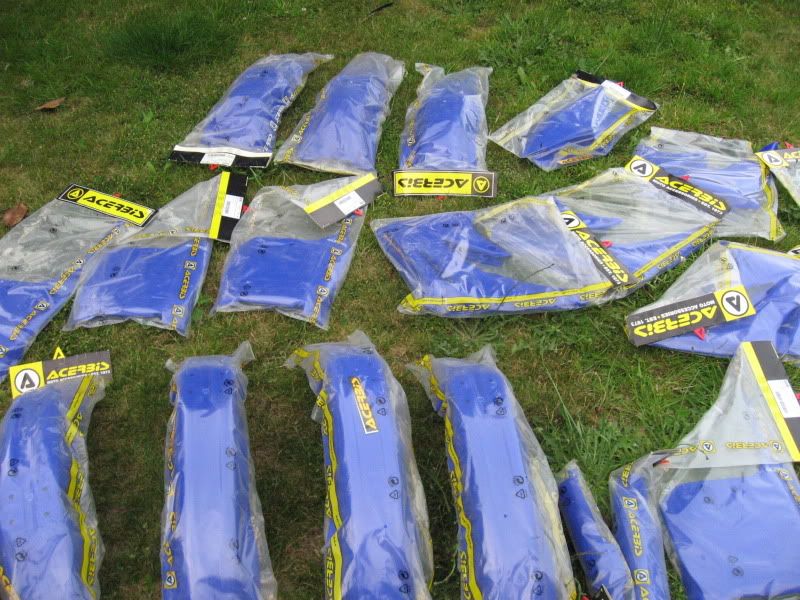
Blue Plastics
I have heaps of blue. I would like to off load some. I don't have the side number plates, but those could be white I suppose. These are from a CRF450R 02-03.
-
UknowDamright

- Posts: 57
- Joined: April 10th, 2010, 5:58 pm
- Last active:
- Location: Hersey, Michigan
I have heaps of blue. I would like to off load some.
How much $$ for a whole set??